Wednesday, July 13, 2011

SIMPLICITY & TEXTURE ACCEPTANCE

So, I'm really getting my routine down to basics and I love it. It's really working out great - less product, less manipulation and healthier hair! I took some tips from Cipriana of "Urbanbushbabes" mainly because her hair type is similar to mine and she has had such great success with hair growth and health over 4 years following her routine. I've modified it to suit me, of course, but here goes:


  • Shampoo monthly with a mild shampoo to remove any buildup on hair


  • Pre-poo and Co-wash bi-weekly with conditioner and olive oil (leave pre-poo on with a baggy and scarf for at least 15 mins to deep condition) rinse hair, apply leave-in and put into medium to small twists all over head


  • Once a week take twists down (using oil and a little bit of oil/water spritz) apply leave-in and re-twist, twist the "twists" together making about 6 big twists and then "band" twists to stretch overnight. Release the 6 larger twists in the morning and style hair in a protective updo for the week. (bun, twists, twist bun with Goody barrette or faux puff bun)


  • Nightly while hair is in protective updo style - spritz hair lightly with EVOO "spray" and tie with satin scarf and satin bonnet before bed.


Generally the only products that I use now are:


Water, EVOO, Hot Six Oil, EVOO Spray, Shampoo of choice (right now it's Jessicurl's Cleansing Cream or ORS Creamy Olive Oil Shampoo), Kimmaytube leave in mix, Aloe Vera Juice, Shea Butter, Jessicurl's Weekly Deep Conditioner or HH Hello Hydration.


I'm also discovering the beauty of my hair the way it is - not twisted to create a certain curl pattern but just appreciating it for it's kinky, shrinky, nappy, poofy self. Check out my video on this:

http://www.youtube.com/user/pstaver1?feature=mhee

Ciao for now!

Tuesday, June 28, 2011

Flexirod, Flat Twist Twistout


I recently did a flat twistout using flexirods to

curl the ends (see my tutorial for this style on my Youtube channel http://www.youtube.com/user/pstaver1) I didn't like it at first, it was a little TOO curly for me, but I played around with it a bit and got it to a point where I could live with it - LOL!

I've been following the exact same routine for about a month or so now and it really seems to be working well for me.

On Saturdays I take my twists down with a little bit of EVOO, divide my hair into two sections, first, saturate my hair with water, Aloe Vera Juice and EVOO spritz, and then apply a deep conditioner to both sides of my hair. I then divide my hair into about 5-6 sections on each side of my head and secure them with clips. Starting on my left side, (because I'm lefthanded, I guess) start detangling each section, first with my fingers then with my shower comb and finally with my paddle brush. After detangling a section I twist it. Once all the sections are twisted, I put on a plastic baggy and then a scarf and deep condition for anywhere from 15 mins to 4 hours, depending on how much time I have and what I'm doing that day.

Next, I rinse my hair in the shower (leaving the twists in) and then shampoo with a non-sulfate hair cleanser or shampoo. Finally, I rinse out the shampoo and then proceed to style with my Kimmaytube leave-in mixture. My style is usually medium sized twists that I leave down over the weekend, and then pin up either in somekind of updo style or pull back into a banana clip bun for the week. This cuts down on frequent manipulation and allows me to leave my hair ALONE. It also cuts down big time on styling time in the morning because my mornings are very rushed and I don't have time to spend forever getting my hair together. To maintain my style throughout the week, I sleep with a satin scarf on and in the morning I just spritz it my hair with my aloe vera spritz, put on a stocking cap to keep the style neat while I go through my morning routine, then, once I'm all dressed with my makeup on and ready to leave the house, I remove the stocking cap and accessorize. About midweek, I may dampen my hair and add some more leave-in conditioner and retwist the twists in the front of my hair if they're looking raggedy. But, that's about it. This routine has helped me tremendously and I think my hair loves it too :)

Ciao for now!

Wednesday, June 15, 2011

New Pics!


Not a whole lot to report - just some pics of new and different styles and my twist n curls! What do you think? I think I'm getting better at the TnC ;)


Ciao for now!


Thursday, June 2, 2011

For the rest of the Grow Out Challenge...


For the remainder of the Naturallycurlly.com GOC (Kim Coles/CurlyNikki), I think that I will be "sock bunning" or banana-clip bunning (on stretched hair) for my protective style. I'll change up the front a bit with either a flat twist or two, pomp or bangs and use headbands and scarves if I decide to pull the front back, but I think that's my game plan. I'll wash, condition and put my hair in 10-15 flat twists for a twist n curl to stretch and then wear a twistout for a day maybe and then bun for the week. I'm getting a little weary of the two strand twist updos - been wearing my hair like that basically since September, in different variations. Now that my hair is actually long enough to bun, I'm going to try rocking that for awhile I can still keep it protected but I need to change it up a bit. 9 months of twists is enough for now.


Above are pics of my sock bun style and my puffy banana clip pony style.


Ciao for Now!

Thursday, May 26, 2011

Bento Eating for Healthy Living - My Adventures in Creating Delicious, Healthy, Beautiful Meals

(Photo courtesy of Wikipedia)

Do what you want to do!

One of the great things about getting older is you don’t care as much about what other people think. You discover the things that make you happy and decide that you’re going to follow your own path. This is one of my reasons for going natural. But, besides natural hair, one of my other passions is making “bento” lunches.


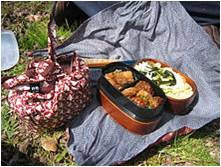
What is BENTO???!!!!


(Photo courtesy of Wikipedia)

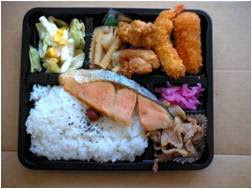
Basically, “bento” is a Japanese or Asian style of packing a nutritionally balanced and visually appealing meal in a compact, box. The word bento, in a nutshell, means “convenient”. I stumbled onto this phenomenon while searching the web for healthy ways that other cultures eat. Initially, I was looking for different foods and how they affect my hair (of course) but when I learned about the art of bento making, I LOVED the concept and decided to give it a try.


Reasons to “bento”:
1). HEALTHY – the concept of bento is to make your lunch nutritionally balanced (according to the Japanese philosophy of nutritionally balanced. It's a slightly different philosophy than the Western view of the Food Pyramid), visually appealing and to help with portion control - cuz’ ya’ll know portion sizes in this country are WAY outta control!

The general rule of thumb for packing a bento lunch is to include 3 parts carbs or grain (rice or pasta, I often use brown rice) 1 part protein (some kind of fish or lean meat or even legumes) and 2 parts fruit and/or vegetables with no candy, junk or fatty foods and no empty space. I know a lot of people out there don't like their foods to touch so, many use the ready-made, compartmentalized boxes or just separate their foods using, foil, wax paper, paper muffin cups, etc. For me, bento is a simple method for weight control and healthy eating without counting calories. Many bento boxes, because they are on the smaller side, only hold about 600 ml of food. In Japan they don't measure these meals in calories, per se, but by the capacity of the bento container so they figure the number of calories correspond to the capacity of the container - thus 600 ml of food is equal to about 600 calories. But, rest assured, if you have a larger appetite, you can buy bento boxes that hold more than 600 ml! I just use that as a guideline for myself. Some of my lunches are larger, some are smaller depending on how I feel - but I try to make sure they are all nutritionally balanced and visually appealing.

Also, the idea is to create a lunch that has a variety of flavors, textures and 
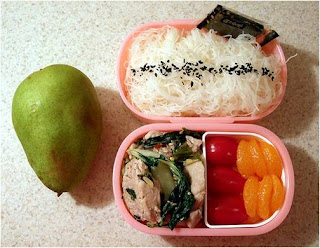
colors. Most bento “gurus” say that a good bento should include 5 colors, white, brown, green, yellow and red or orange. In order to have all these colors in your meal, you have to have a variety of sources – particularly the green, red, yellow/orange. Those are the colors of many fruits and veggies. (Photo courtesy of Wikipedia)

2). SAVES MONEY– it stopped me from running to McD’s everyday for lunch.

3). IT MAKES ME SMILE – The anticipation of knowing that I have my own, cute little lunch that I took the time to pack myself not only keeps me away from the fast food restaurants during the day, but just plain adds some joy to my life!


Different Types of Bento –
(Photos courtesy of Wikipedia)
Bento lunches range from the very basic and simple to the incredibly elaborate. Many people take a lot of time preparing their bento lunches and some have turned it into a form of food art; using food to create cartoon characters, cute cuddly animals and even landscape scenes! These elaborate bento meals take a lot of time to prepare and are very interesting and fun to look at.


My Bento Lunches:
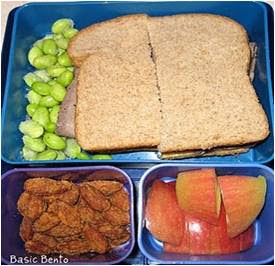
(These 2 photos are MY own bento creations!)
While I do enjoy perusing the bento websites and marveling at the elaborate works of food art…I 
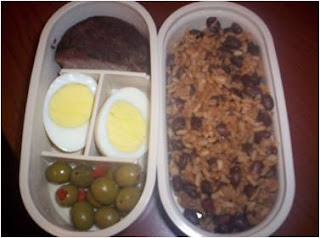
‘aint got time for all that! I keep my bentos simple and try to prepare them either the night before or in the mornings in under 15 minutes. That means I use a lot of easy to pack, already prepared foods, like pre-cut or baby carrots and celery sticks, broccoli spears, cheese cubes, boiled eggs, cherry tomatoes, grapes, etc. and my main ingredient - leftovers from dinner the night before! I do try to keep it balanced and interesting, though. Every once in a while I’ll get the notion to “create” something cute. And I have been known to put cute little faces on my boiled eggs or something, but that doesn’t happen very often – LOL!

What do you carry your bento lunches in?
I started out using just some good ‘ol square, oval or compartmentalized Tupperware-type containers, which is perfectly acceptable. But, then I decided that I wanted some “real” bento boxes so I purchased a couple. They just make the whole bento experience more fun for me.

Do what makes you happy

When I first started with my bento obsession, my
co-workers were curious about my little lunches and lunch boxes. My family thought I was silly. They would watch me make my lunches and ask me questions about it. When I explained what bento was all about they would give me the *side-eye* like I was crazy; much like they did when I started going natural with my hair! But, I don’t care. It makes me smile, and that’s all that matters. I don’t need their approval. And, hey, I’ve maintained my target weight, I'm healthy and I've saved a lot of money over the last year, just by changing how I eat my lunches everyday, so now who’s crazy?


(Me giving THEM the *side-eye*...HA!)


If you're interested in learning more about making Bento, check out:http://www.lunchinabox.net/


What do you do to eat healthier?

Visit my YouTube channel at:www.youtube.com/user/pstaver1


Ciao for Now!


Article by Evelyn Ngugi of "Kinks & All" from naturallycurly.com

I really love this article by Evelyn Ngugi. I subscribbed to her You Tube Channel "Spicyeve" today. For one, her hair texture is similar to mine, and she talks about all the things that she's discoved so far during her natural hair journey. I love how she makes a point to discuss what she can't do with her hair, even though you see others do it - it helps me a great deal ( I don't look right in minitwists either, at least not in the front of my hair because it's thin - LOL!) Check it out!
Ciao for Now,
Pam


My ‘fro has grown this year! The last photo is a blowout from this past summer. I haven’t done a blowout since, but I know my hair is even larger!


January 17, 2011 was my afro’s first birthday, folks! To celebrate, I made a video to explain why I went natural and why I make natural hair YouTube videos. I also feel it’s not enough to simply go natural. You’ve got to pay attention to your hair and learn something! Below is a list of things I learned my first year natural.

1. I need a “detangling my hair” playlist. Musiq Soulchild just seems to make the comb glide through my hair, and it seems like my coils like Bilal better than any conditioner.

2. Aloe vera does nothing to my hair that water can’t as a spritz. But it is good to mix with leave-in conditioner and a bit of oil. When I want to stretch my hair just for the purpose of pinning it up, that mixture works great on twists. Mmm, fluffy.

3. I have relatively thin and fine hair, naturally. Thin, as in the number of hairs on my head is less than average and fine, as in the diameter or width of a strand of hair is smaller than average.

4. Because of #3, I CAN’T rock mini twists. It just can’t be done.

5. Being natural taught me to love myself, so #4 doesn’t phase me; I can move on to different protective styles.

6. Oyin handmade is one of the most amazing hair care companies out there. So is Kinky Curly.

7. I am extremely comfortable with my shrinkage and LOVE to wear regular afros or wash n’ goes (the legit ones, like just washing and GOING, not 1 hour spent defining your curls). While I love my shrunken hair, it was easy to neglect it and not keep it properly detangled. That led to split ends, and ultimately cutting some hair again. I’m rocking stretched out hair now and re-twisting every night. Honestly, I resisted it. I didn’t want to put in the work.

8. Strangers will go out of their way to compliment your hair. Especially people who realize the importance and beauty of what you did. A white woman with biracial kids complimented my twist out. A white chick with locs said she loved my hair. A black dude with a picked out ‘fro wanted tips on how to wash it. These were all strangers on the city bus.

9. Coconut oil is God’s gift to afro textured hair. I feel like it was made specifically for me or something. This stuff is the TRUTH.

10. Growing your edges back takes a really, really, REALLY long time.

The most important thing I discovered this past year is that I am never going back to permanently straightened hair. This is me. One year natural. Here’s to the rest of my life!

WHAT DID YOU LEARN YOUR FIRST YEAR NATURAL?

Mature Curlies: "5 Top Tips for Thinning Hair"

This is a very informative article that I found on "naturallycurly.com"


You’ve finally learned to love your curls . . . and now you’ve noticed those once-lustrous locks are thinning. Oh, the injustice! Don’t despair—we’ve compiled five tips to keep you and your curls looking chic and stylish at any age.

1. Rule out a medical issue.
While everyone’s hair thins a bit with age and thinning hair can be genetic, it can also be a sign of a medical issue like anemia or thyroid problems. Debra Jaliman, MD, a New York City-based dermatologist, recommends asking an endocrinologist or dermatologist to rule out these issues. “Most medical doctors are not the ones to rule out medical issues. A dermatologist or endocrinologist would be the best medical experts to go and see,” she explains. A poor diet may also contribute. Fortunately, “if you lack iron and start eating red meats then the hair will regrow once your diet is appropriately balanced,” says Jaliman.

2. Consider Biotin supplements.
According to Jaliman, biotin supplements (also called vitamin H for “Haar and Haut,” which mean “hair and skin” in German) can help thicken hair and strengthen nails. Though biotin occurs naturally in some foods, few food sources are rich in the vitamin, so during the 1940s, Swiss scientists developed a synthetic process to replicate it. Biotin supplements are now available over the counter, and Jaliman says they are extremely effective.

3. Keep it short.
A short, multi-layered haircut can help create the illusion of fullness. “When we are younger, we let our curly hair grow longer, because the ‘weight’ straightens it a little when we blow-dry it straight,” explains Sandy Dumont, a Virginia-based image consultant and founder of The Image Architect. “However, it isn’t wise to keep hair at a longer length when it is thinning, because it will look droopy. A ‘stacked’ haircut gives the appearance of more volume, so that’s a great style.”

4. Lighten up.
The more contrast between hair and skin tone, the easier is it to see the scalp. Dumont has blond curls and says that when light hair thins, the effect is subtle. “You rarely see the scalp near the front or at the crown, like you do with dark hair,” she explains. If you have darker hair, Dumont suggests teasing it slightly at the crown to cover the scalp or going a little lighter to soften the contrast. “Streaks will do; it isn’t necessary to lighten the hair all over,” she adds.

5. Focus on the temples.
Even with lighter hues, thinning hair can show up around the temples, where the hair tends to be more fine to begin with. “Make sure that is covered with bangs or a side part with partial bangs,” suggests Dumont. “Curly hair that thins at the temples will make any woman look like ‘granny with a permanent,’ so it’s important to have a stylish hairstyle.” Good advice for all of us!